KYC Toolbox Application Notes for Re-Checks
- With this function it is possible to check an entire customer list (Batch Name Check) as well as to handle the Ongoing Monitoring incl. Whitelisting (Verify Risks or Assess KYC Files is assumed).
- A customer list can be read into the Toolbox (via API or upload of a CSV file) or all already registered customers in the Toolbox can be re-checked with one click.
- The requirement for the usage of the whitelisting is to store your customer data in the Toolbox (Document Store).

Procedure for Re-Check incl. Whitelisting
- There are four different options for the re-check incl. whitelisting of customers:
- manual, renewed KYC check of a customer by clicking on "Check Risk" at the respective customer file.
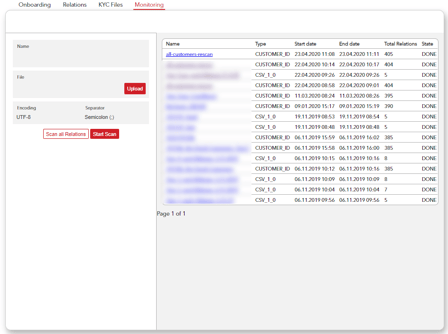
- by clicking on the "Scan all Relations" button, a new KYC check is automatically performed for all customers registered at the Toolbox and the report is saved in the respective KYC file.
- processing of the re-check via API. We would like to refer to the API documentation for more information (the API documentation is available at any time in the KYC dashboard).
- execution of the re-check via upload of a CSV file.
A technical description regarding the available formatting and an upload template are available in the KYC Toolbox, Technical Documentation. - Condition to enabling the whitelisting function is to verify and save potential hits via "Verify Risks"
- Alternatively, the final risk assessment can be set in the tab "KYC Files" under "Properties" by clicking on the "Assess KYC File" button
- If you run a check again, only the changes are noted.
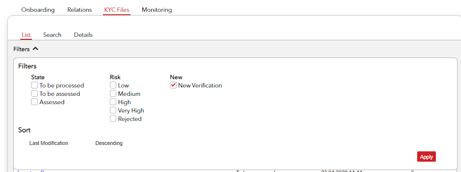
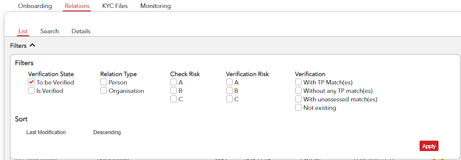
- If changes or new potential hits have been found, the respective entity is assigned the status "New Verification" (KYC Files overview). If the Verify Risks has been effectuated, the status "to be verified" is shown in the Customer tab.
- The status "New Verification" can be filtered in the tab „KYC Files”.

- The status "To be Verified" can be filtered in the tab „Relations”.

- These entities can be checked again with the functions "Verify Risks" or "Assess KYC File”.
Procedure to Re-check all customers entered in the Toolbox
(option 2 mentioned above)
- If customers are registered in the Toolbox, a new KYC Check can be started for all customers with a single click.
- For this you have to click on the button "Scan all Relations" only and all customers stored in the Toolbox will be checked again and a new KYC Check Report will be stored.
Upload CSV file or API
(option 3 or 4 mentioned above)
- If the data is imported by uploading the CSV file or via API, a KYC File is created for all customers on the list and existing customers will be updated.
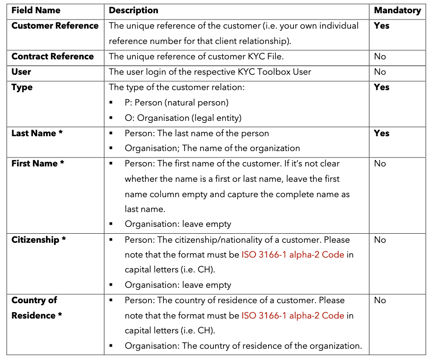
- For this purpose, the CSV file must contain a unique reference in the column for "KYC File Reference" and "Reference", which corresponds to the data stored in the Toolbox.
- If a new "Reference" is used, but the same "KYC File Reference", the customer is listed and checked as a new entity in the Toolbox under the same contract relationship.
- The KYC File Reference can be skipped. If one is used, under no circumstances may the KYC File Reference deviate from the data already stored in the Toolbox. If this is still the case, a new KYC File is created. You receive an error message if only one of the values is different.
- The format description of the CSV file can be found as linked above in the KYC Dashboard.

Remarks on the monitoring section
- By clicking on the name of the scan (blue position) the result of the comparison is shown immediately.
- With the button "Download Result" the result can be downloaded in a CSV and serves as help for the verification of the potential hits.

- The result (Download Result) can be displayed as follows:
-
- NO_RISKS_FOUND: No risks where found for the customer.
- POSSIBLE_RISKS_FOUND: Some possible risks where found for the customer.
- PROBLEM + Error Message: There was a problem with the customer.
- The KYC Check Report is automatically created and stored in the KYC File for all successfully checked customers.*
- In order to verify potential hits, the respective customer can be opened in the Toolbox and the verification can be done by using "Verify Risks".
Advice for the Scan functionality
If the SCAN is used to check risk files that have already been created, there are three ways of using the function:
A) The "Reference" and the "KYC File Reference" always match the data already stored in the Toolbox. The SCAN re-checks the entities, and the KYC Check Reports are continuously saved in the same KYC file.
B) The "Reference" does not match the data already stored in the Toolbox. If the SCAN is executed under these conditions, a new entity is created in the Toolbox with the same customer data. If no alternating customer IDs are desired, this way of using the SCAN is not recommended. The Reference must always remain the same or has to be skipped.
C) The SCAN can be used by the Toolbox setup at the beginning of your subscription period, to properly secure all customer relationships in the Toolbox with a batch or to directly and automatically subject these to a KYC Check. Choose the "Reference" and the "KYC File Reference" carefully. Once the entities have been created via a SCAN in the Toolbox, they can be corrected manually afterwards, but not with submitting a corrected CSV file.
Costs for the Monitoring (Re-Check)
The Re-Check with the Scan function costs 4 Coins if the customer already exists in your Toolbox. If a New Customer is created, additional 6 Coins will be deducted.
